External disks such as external hard drive, thumb drives, and SD cards are frequently used as extended storage for digital devices or portable media for file sharing.
Using physical external disks will sometimes encounter unexpected situations. For example, when you connect an external disk to a Mac, the disk becomes readable but not writable.
The read-only state could result from limited file control, unsupported NTFS access or corrupted disk protection. We will look into each cause and illustrate detailed solutions.
If you know the cause, you can jump to the specific case and find the solutions. If not, read through the article to get the read-only disk problem resolved.
Case 1: You have read-only file privilege over the external disk
It happens often if you get the disk from another hand. The previous owner has set up read-only permission to this disk to protect data from unwanted changes.
If the read-only permission was set up by third-party software, you will need the same software to change the file permission. If the permission was set up on the Mac computer, follow the following steps to change read-only files on Mac.
- Step 1: Connect the external hard drive to the Mac and wait for it to be mounted on the desktop.
- Step 2: Right click the icon of the external disk and select Get Info.
- Step 3: Unfold Sharing & Permissions at the bottom. A message ” You can only read” will be shown underneath.
- Step 4: Click on the lock at the corner and input your user name and password.
- Step 5: Click the Read only under Privilege of your user name and select Read & Write.
- Step 6: Click on the lock to ensure the change.
If you are the administrator of this computer, you can also tick the box in front of “Ignore ownership on this volume” and then input your admin password to be able to write to the external disk.
Case 2: macOS has read-only support to NTFS-formatted disks.
If the restrained file permission is not the cause, file system incompatibility could be the roadblock. Still in the Get Info window, under General information, you can see the Format is Windows NT File System.
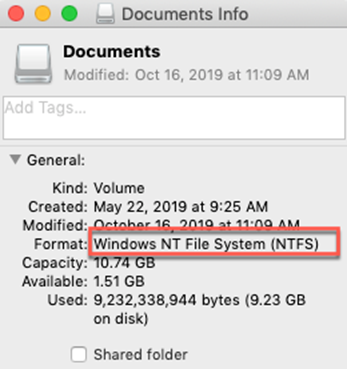
NTFS is the proprietary file system by Microsoft and macOS only allows read-only access to NTFS. When using an external USB drives such as external hard drive, solid-state drive or thumb drive, you will find you can’t store any files to it and existing files are locked or read-only.
To enable full NTFS read and write access, you can modify macOS kernel extension through commands. But it will become tedious because you need to do it every time you restart your computer.
Another one-for-all solution is to back up the current files and format the disk to FAT or exFAT. The drawback is that it is time-consuming especially when you have tons of data to back up.
We recommend you install free NTFS for Mac to read/write to a Windows NTFS drive.
- Step 1: Download iBoysoft NTFS for Mac or any other app you may be interested in.
- Step 2: Install the app and launch it following the onscreen wizard.
- Step 3: Read & write to NTFS-formatted disks freely if the disk is automatically mounted in read-write mode. If not, manually unmount and remount the disk by yourself.
Case 3: The external drive becomes read-only because it is corrupted.
Most times, when a disk is corrupted, the macOS is unable to mount it or shows “the disk you inserted is not readable by this computer” error when it is plugged in.
It is rare that a corrupted disk still can be viewed as usual. However, in a certain scenario, the disk still can be mounted in read-only state to prevent data overwritten from any writing activities.
This could be a warning sign that your external storage device is failing. You should get hands on saving your files and fixing the corrupted disk.
- Step 1: Move your files to another destination to make sure they are safe before the disk completely stops working. If necessary, use professional data recovery software to restore important files.
- Step 2: Open Disk Utility and find the disk on the right sidebar. Disk Utility can be found in Applications folder in Finder.
- Step 3: Right-click on the disk and select Run First Aid.

- Step 4: Eject the disk safely and reconnect it to the Mac if the disk still can’t be mounted to be editable.
First Aid can only fix minor software errors on a storage medium, so big chances are that it may fail to fix the read-only disk.
To remove all errors, you can format the disk in Disk Utility using Erase option with an adequate backup first.
Conclusion
When external hard drives, SD cards, or USB flash drives suddenly became read-only, don’t panic. The problem is totally solvable with free and easy solutions.
We want to remind you again, formatting the disk to get rid of NTFS file system or repair the corrupted file system will delete all files on the portable disk, so remember to back up files first when conducting erase option.
Leave a Reply