There are times when you just want to spend hours and hours on Facebook, uploading and sharing pictures and videos of your pets, or what you had for lunch the other day. If this seems like your type of leisure activity, then you can secure your account by following these simple steps.

Facebook Privacy Guide
Step 1: Login to Your Facebook Account
First, the most obvious thing to do is to log in to Facebook. Enter your username, or your email address, and then your password. Do not check on ‘Keep me logged in’ – Because if you do, there will be a bigger chance of hackers gaining access to your account. Another tip is to have a very strong password that no one will be able to find out. Your password also has to be very long.
Once you’ve familiarized yourself with the current setup of your account, you have to choose which changes you have to make to your share settings. If you want to see a preview of your account as other Facebook users see it, just sign into your account, and choose the gear icon found on the top right corner. Then click on ‘Privacy settings’, then ‘Timeline and Tagging’, located on the left pane.
Step 2: Set Who Can See Thing on Your Timeline
The second step is to select ‘View As’ found on the right side of ‘Review what other people see on your timeline’. This is located in the ‘Who can see things in my timeline?’ section. Click on ‘Okay’ to close the pop-up window if you need to. Your timeline will show up as how it is seen by the public.
Facebook Profile
If your timeline can only be accessed by people in your friends list, the public will only see your cover photo and profile, as well as a link for contacting you. This link can also be set to Friends Only, or Friends of friends.
Aside from this, people will also be able to see the people you’re following, and the groups you’re a member of. If you want to see your profile the way a particular Facebook user sees it, just click on ‘View as Specific Person’ above the window, and type in the person’s name.
To modify the users who can look at your timeline, go back to Facebook’s ‘Timeline and Tagging’ feature, and click on ‘Edit’, found on the right side of ‘Who can see posts you’ve been tagged in on your timeline?’ as well as ‘Who can see what others post on your timeline?’ Pick your selections for every setting in their drop-down menus, and click on ‘Close’ when you’re done.
Step 3: Modify Privacy Setting
Next is to modify your privacy settings. This is a major step that you have to take when it comes to protecting your Facebook account. Go to Settings > Security. Above, you will find an option called ‘Secure browsing’. You have to edit this option by checking ‘Browse Facebook on a secure connection (https) when possible’. This feature will also add more privacy to your Facebook account.
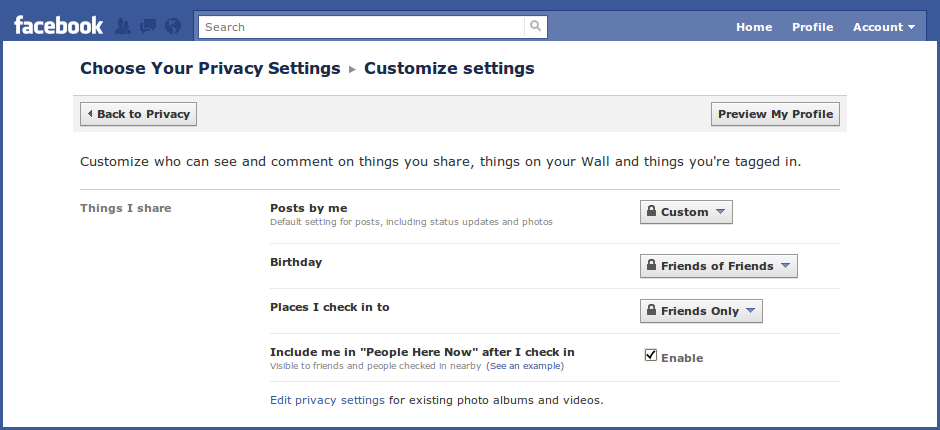
Facebook Privacy Settings
Another way is to go to Settings > Security. You will find ‘Login Notifications’. Edit this option, and then click on the boxes for both available options found there. Once you log into your account from another person’s computer, you will get a message saying that someone accessed your Facebook account. It’s obviously fine if you’re the one who has opened your own account, but if you receive this message, then this could mean that an unauthorized person has attempted to log into your account. What’s more, this feature will inform you of the browser name, the computer operating system, and even the time of login to help you with your investigation.
Give your account some extra privacy settings is to go to the third option in Settings > Security. This should say ‘Login approvals’. Then click on ‘Edit’ and the box that reads ‘Require a security code to access my account from unknown browsers’. There will be a popup box that says ‘Login Approval’ is an extra layer of security that uses your phone to protect your account’. You need to click on ‘Get Started’. An advantage of this privacy method is that Facebook itself will send you a text message on your phone if someone attempts to log into your account from an unknown browser.
Step 4: Setting Your Secured Contacts
Go to the Contacts’ option found in Settings > Security. This feature lets your valid contacts on Facebook help you return to the site if your account gets hacked or if you have forgotten your password. Include some trusted contacts (at least three people), and you’re finished.
Step 5: Setting Who Can See Your Timeline and Profile
Go to Settings > Privacy. You will find an option labeled ‘Who can see my stuff’. Edit this option by changing it from ‘Friends of friends’ to ‘Friends (only)’. If you allow the friends of your friends to look at your stuff, people who are friends of your friends can also look at your timeline. But the downside here is that one of them can be a hacker who wants to gain access to your account.
If you want to share or post a video or pictures, you can click on the ‘Friends’ option. This means that the files that you share on your account will only be viewed by your friends. In ‘Settings’, you can also click on ‘Timeline and Tagging’ and change ‘Friends of Friends’ to ‘Friends (only)’. But if you want the friends of your friends to see your timeline too, then feel free to select that option. This, however, will make your account less secure and more prone to hackers.
Now that you have already figured out how to let certain people view your timeline, the next step you need to learn is how to prevent friends from posting on your timeline, and hinder them from seeing pictures that a friend wants you tagged in? You can do this through the ‘Timeline and Tagging’ settings.
There are only two choices for ‘Who can post to my timeline’ in ‘Who can add things to my timeline’: These are ‘Friends’, and ‘Only me’. If you want to enable the review of the posts or pictures that you are tagged before they show up in your timeline, click on ‘Edit’, found on the right side of the entry. After that, choose ‘Enable’ in the drop down menu.
Leave a Reply